“Theory and practice sometimes clash. And when that happens, theory loses. Every single time.”
Linus Torvalds
The moment I felt Linus’s philosophy transcend operating system design and touch my own life was when I first read that sentence. In my life, theory and practice have always clashed, and overcoming the reality of theory required intense, information-heavy labor. Even though I didn’t always find my self-confidence sufficient in such moments, this quote became the spark for a project I’ve wanted to do for a long time. That spark convinced me that it was time to push past the clunky structure of Arduino, touch the “bare metal” hardware of the Raspberry Pi (without an OS), and ultimately shake hands with the STM32 ecosystem. Once I found the energy to break away from the “cotton-wrapped” libraries of Arduino and get my hands dirty with raw hardware, I ordered the STM32F103C8T6—the small, cheap, but high-promise Blue Pill.
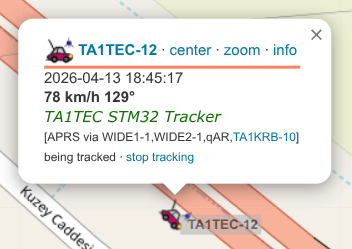
After soldering the headers onto the Blue Pill, I had only one project in mind: An APRS Tracker. Was it doable?
Of course it was, but how was I going to do it? I was somewhat familiar with the AX.25 protocol, but I knew the packetization and the “bit-stuffing” agony would be a challenge. Up until now, I had always used ready-made code and hardware. Barış Dinç’s hymTRacker worked perfectly, for instance. But moving away from the “resistor ladder” (R2R) architecture to a more lean hardware like the Blue Pill for a PWM-based tracker seemed very logical. Yet, Linus’s famous words echoed in my ears again: Theory vs. Practice… Everything was perfect in theory, but what about the practice? Let’s take a closer look.
The STM32 development environment is worlds apart from Arduino. While there are claims that you can develop using the Arduino IDE, in my opinion, it’s no different than installing an LPG tank on a Ferrari. Therefore, using STM32’s native environments, CubeMX and CubeIDE, was the most logical solution. CubeMX is the environment where you handle pin configurations. You decide which pin will be used for what (e.g., baud rate, input, output, timers, etc.) at the very beginning and generate the code accordingly. This configuration automatically populates the main.c file. While CubeMX and CubeIDE were separate programs in version 2.0, MX comes built-in with CubeIDE 1.19. This allows us to handle both configuration and software development in a single tool. I chose the simple route and proceeded by installing version 1.19 on Fedora.
When it came to the programming stage, the first project that caught my eye was q8vps’s vp-digi. It is the best (and in my opinion, perfect) APRS digipeater written for the STM32F103C8T6. With FX-25 support, optimization, and stability, it is a masterpiece gifted to the amateur radio community. However, it lacked one thing: Tracker mode. What the Iron Cross/Explorer guitar is to James Hetfield, the APRS Tracker is to my amateur radio activities. So, I set to work with a single sentence in mind: “How hard could it be to add a GPS parser to its AX-25 packetization?” It wasn’t like that at all…
Parsing $GPRMC strings while managing interrupt conflicts, trying to generate an AFSK signal while GPS data is flowing, and handling the protocol while processing data required being a literal orchestra conductor.
In the middle of all this, I decided to switch radios. I retired the QYT KT-8900D, which I wasn’t very happy with due to its unstable performance, and replaced it with a fanless, stable, and compact device: the AnyTone AT-779UV. But I hit a wall again. Triggering TX on the Anytone didn’t work with the classic method of pulling the PTT pin to GND. Nothing I tried worked. Then, I suspected a serial protocol might be involved. I disassembled the radio mic and connected the relevant pins to a Logic Analyzer. I decoded the PTT ON and OFF commands, only to later discover deep in the heart of GitHub that unsword01 had already decoded the protocol in much greater detail. My hat is off to him.
Okay, the Anytone AT-779UV worked this way, but this tracker was intended to be used with other radios as well. For this reason, I wanted to use a 2N7000 for triggering and added a switch to pull the PTT pin to GND. Here, I hit another wall. Since the threshold voltage ($V_{GS(th)}$) of the 2N7000 is between 0.8V and 3.0V, and the STM32 operates with 3.3V logic, it didn’t work reliably. Abandoning voltage-based triggering, I decided to use our old friend, the 2N2222, to trigger via current. To prevent interference from high-power transmissions at 144.800 MHz, I used a 10 nF (103) ceramic capacitor for filtering instead of 100 nF. Note: Usually, 2N3904 is used in these projects, but I prefer 2N2222 due to its higher gain.
We’ve praised the Blue Pill enough; let’s bash it a little. Finding an original one on the market is nearly impossible; we have to use clone boards—and to be fair, we owe their price/performance ratio to this “clonality.” The main difficulty of working with this board, unlike the “plug-and-play” comfort of Arduino, is the lack of an onboard debugger. To upload code, you either have to play “Lego” with the boot jumpers over UART or use an external ST-Link. I tried both; the ST-Link was much faster and more stable, but I hit yet another wall: because the chip is a clone, native debugging via CubeIDE was impossible. Consequently, I had to package the program as a .hex file and upload it manually using STM32CubeProgrammer. But hey, as long as that beacon gets on the air, the rest is just details.
The “dead-bug” first prototype turned out as seen in the visuals. I haven’t finished the documentation yet, but I’m writing this because I was too excited to wait to share the details with you. I will update this post by uploading the manual, tips, tricks, and program files to my GitHub page as soon as possible.
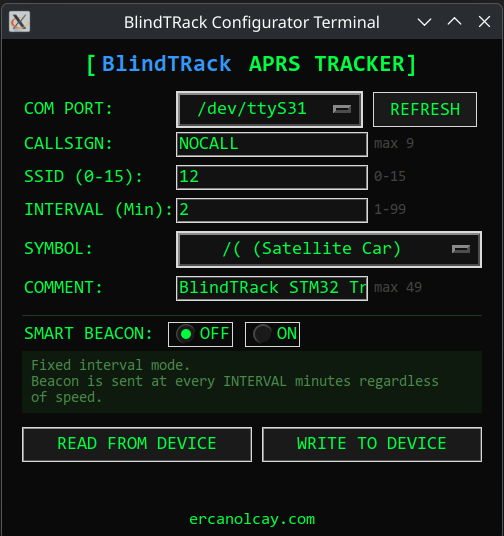
Edit: Since my initial post, I’ve decided to take the project a step further. What started as a quick holiday idea has materialized into the “BlindTRack Config” utility. I’ve updated the internal firmware to be fully parametric and paired it with a Python-based interface.
By utilizing UART communication over pins PB10/PB11, this tool simplifies the entire setup process. Now, settings like callsign, TX interval, SSID, and comments can be updated instantly.
Check out the GitHub Repo.
July 4, 2026: Added the smart beaconing feature and updated the repository.

See you in future days where every theory clashes with practice, and practice emerges victorious.
TA1TEC, 73.