When I first saw Murat Şen‘s YouTube video titled “Make Your Voice Heard by the International Space Station” back in 2018 or 2019, I remember asking myself, “Could I do this too?” Even though the idea popped into my mind from time to time over the next 6–7 years, I couldn’t fully focus on it due to the pandemic and work-related responsibilities. But when I finally achieved my first goal of becoming a licensed amateur radio operator in the second half of 2023, I had just one question on my mind: How can I make my voice heard by the ISS?
After becoming a ham radio operator, I realized I also needed to understand the different layers of amateur radio. As I started researching topics like UHF, VHF, HF, APRS, and CW, my field of interest expanded greatly. Bit by bit, I began to understand and learn about each topic. Among them, APRS really stood out to me—it was fascinating. The idea that sound waves could carry messages, location data, or even weather info and convert it into readable text was mind-blowing. I’ll share more about my amateur radio journey in future blog posts and link them here when available.
What is APRS?
APRS (Automatic Packet Reporting System) is a system that allows amateur radio operators to send digital data such as location, short text messages, weather information, and emergency alerts over radio frequencies. This data is usually gathered from GPS devices and transmitted in small digital packets.
With APRS, you can:
*See where other radio stations are,
*Send short text messages,
*Receive data from weather stations,
*Share data globally via satellites or ground stations.
If these data packets are received by a station connected to the internet, they become visible on websites like aprs.fi. In other words, the message you send via radio can become globally accessible in seconds. You can find more detailed information at aprs.org.
Preparation Process
Although the preparation didn’t begin with directly sending APRS to the ISS, all my amateur radio activities along the way contributed to this goal.
Like many others, I started amateur radio with a handheld device. For the first 1–2 months, I simply listened to nearby repeaters. Eventually, I began making my first QSOs. However, the 5-watt power output and stock antenna of my handheld radio had serious limitations. I decided to build a better antenna and came across VK2ZOI’s website, which featured a half-wave dual-band “Flower Pot” antenna for UHF and VHF. I chose to build it using the guide provided here.
Once I finished the Flower Pot antenna, I connected it directly to my handheld without any SWR measurements. I could now hear repeaters I previously couldn’t and even transmit to them. It was incredibly motivating to experience something that once seemed impossible. At this point, I began searching for a handheld radio capable of APRS transmission and reception, which led me to the Anytone AT-D878UVII Plus.
Without diving into too much detail, I discovered that, due to my location, I couldn’t receive or send APRS signals effectively with the stock antenna. But with the Flower Pot antenna, it worked. This success made me realize I needed a radio with higher output power and a built-in APRS modem. That’s when I chose the Yaesu FTM-300. While its menu system seemed complex at first, its capabilities ultimately proved that I’d made the right choice.
As I gained more knowledge and hands-on experience with amateur radio, my curiosity and motivation for research grew. But here came a small disappointment: those who successfully sent APRS to the ISS were mostly using Yagi antennas, not Flower Pots. A Yagi antenna directs its signal in one direction with higher gain, unlike an omnidirectional Flower Pot. I began to doubt whether my signal strength and gain would be enough. Living between tall buildings made it impractical to orient a directional Yagi antenna properly. You might ask, “Couldn’t you just go outside and try it?” The answer is yes, but the idea of preparing all the gear and carefully planning the time and location for a specific ISS pass, only to possibly fail, was too discouraging. I didn’t want to risk giving up on the dream altogether.
Tracking ISS Passes
Knowing the exact time, date, and elevation angle of the ISS’s pass over your location is crucial for preparing and successfully sending APRS. There are many websites and apps for this, but my favorite is the free app “ISS Detector” available on Google Play. Once installed and granted location access, it shows you the time, date, and angle of the ISS’s pass for your specific location. You can also set notifications from 1 minute to 1 hour before a pass. Another great feature is the map view that visually shows the start and end times of each pass.
Radio Settings
The settings to be configured on the transceiver are as follows. Since the Yaesu FTM-300 menu is in English, the menu settings are provided in English:
Frequency: 145.825 MHz
APRS Modem: ON
APRS Tx Delay: 250 ms
APRS Message Text: TA1TEC Op. Ercan 73!
Beacon Tx:
— Auto: ON
— Interval: 30 sec
Digi Path: Path 1
Digi Path 1: ARISS
My Position Set: GPS
These are the transceiver settings. The frequency is 145.825 MHz, which is the APRS receive/transmit frequency used by the ISS. An important detail here is that automatic APRS transmission is set to every 30 seconds, and the Digi Path is set to ARISS instead of the typical WIDE1-1,WIDE2-1 used for terrestrial APRS operations.
Reaching the ISS
On July 21, 2025, the ISS was scheduled to pass over my location at 23:02 local time. With a pass elevation of 66°, it was definitely worth trying. I configured my radio as described earlier and set it to automatically send APRS packets every 30 seconds. Then I waited.
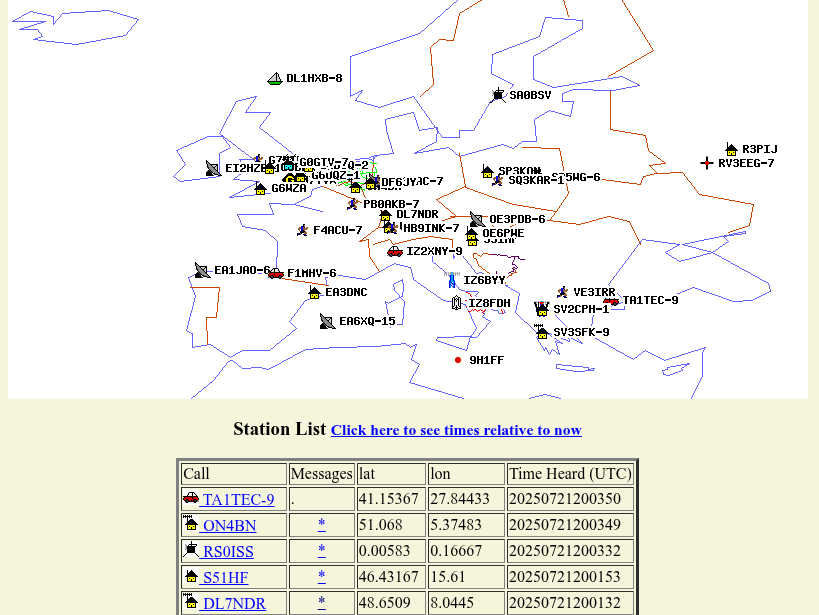
While my radio was transmitting APRS packets, I monitored ariss.net, which lists amateur stations heard by the ISS in real time. At exactly 23:03:50, I saw something I had dreamed of for years appear before my eyes. My callsign, TA1TEC-9, was right at the top of the list. I couldn’t believe it at first—I refreshed the page multiple times. But it was true. I had successfully transmitted an APRS packet, and it had been received by the ISS.
Below, you can find screenshots from ariss.net, aprs.fi, and raw packet data as proof.

TA1TEC-9>TQPY22,RS0ISS*,qAO,DL1NUX-1:`7N^l#S>/`"6<}TA1TEC Op. ERCAN 73 ta1tec@outlook.com_1
TA1TEC-9>TQPY23,RS0ISS*,qAU,DB0FOR-10:`7N^l#=>/`"6>}TA1TEC Op. ERCAN 73 ta1tec@outlook.com_1
Conclusion
It’s hard to put into words the feeling of accomplishing something you’ve dreamed about for years. Setting a main goal and then breaking it down into smaller achievable steps not only helps overcome obstacles, but also makes it easier to stay motivated when you look back and see how far you’ve come. I’ve accomplished one of my biggest dreams. So, what now?
Of course, I’m not planning to stop my amateur radio activities just because I achieved the goal that started it all. 😊
From now on, I’ll continue exploring both amateur radio and APRS in more depth. Being able to send APRS to the ISS has given me even more motivation to focus on this area. Who knows—maybe one day I’ll make a QSO with the ISS, or even travel there myself. 🚀👨🚀
TA1TEC, 73!